This blog was created to share my experiences to help other people. On this page you can find an information about Linux/Unix (Redhat, HP-UX, OEL, Debian …etc.), backup, storage and troubleshooting topics.
Can’t edit /etc/resolv.conf with root account problem.
- A file is set with ‘i‘ attribute, cannot be modified (immutable). Means no renaming, no symbolic link creation, no execution, no writable, only superuser can unset the attribute.
- we use the + sign and to unset use the – sign with the chattr command.
+ : Adds the attribute to the existing attribute of the files.
– : Removes the attribute to the existing attribute of the files.
= : Keep the existing attributes that the files have.
vi /etc/resolv.conf
/etc/resolv.conf" [readonly] 12L, 301C
[root@rhel6 ~]# lsattr /etc/resolv.conf
----i--------e- /etc/resolv.conf
[root@rhel6 ~]# chattr -i /etc/resolv.conf
[root@rhel6 ~]# lsattr /etc/resolv.conf
-------------e- /etc/resolv.conf
[root@rhel6 ~]# vi /etc/resolv.conf
-bash: /bin/rm: Argument list too long wile removing files
Problem:
I have a directoy in linux that has several hundred thousand files, and is about 8.2 Gb. I attempted to clear out the directory using ‘rm -rf *aud’, and got the following error:
Oracle audit files:
[oracle@drexa01dbadm01 rdbms]$ du -sh audit
8.2G audit
[oracle@drexa01dbadm01 rdbms]$ cd audit/
[oracle@drexa01dbadm01 audit]$pwd
/u01/app/oracle/product/12.1.0.2/dbhome_1/rdbms/audit
[oracle@drexa01dbadm01 audit]$ rm -rf *aud
-bash: /bin/rm: Argument list too long
[oracle@drexa01dbadm01 audit]$
Solution:
[root@drexa01dbadm01 audit]# find . -name '*aud' | xargs rm -v
removed `./opum_ora_5570_20170419113001272611143795.aud'
removed `./opum_ora_19087_20170825213720316402143795.aud'
removed `./opum_ora_24477_20170215033002283227143795.aud'
removed `./opum_ora_7691_20160815080001986930143795.aud'
removed `./opum_ora_16653_20160907043002231684143795.aud'
removed `./opum_ora_13406_20170127234157760483143795.aud'
removed `./opum_ora_20966_20160830140953226189143795.aud'
removed `./opum_ora_32328_20160302052636008652143795.aud'
removed `./opum_ora_8918_20170924193849158242143795.aud'
removed `./opum_ora_3496_20160915031853572953143795.aud'
removed `./opum_ora_6372_20161020181850094006143795.aud'
removed `./opum_ora_14855_20161014233431338219143795.aud'
removed `./opum_ora_3543_20160320162656730084143795.aud'
removed `./opum_ora_507_20171004204104885761143795.aud'
removed `./opum_ora_28535_20160510060437060235143795.aud'
removed `./opum_ora_12919_20170501052812370394143795.aud'
removed `./opum_ora_19556_20161209185701631815143795.aud'
removed `./opum_ora_4558_20170821004123546569143795.aud'
removed `./opum_ora_12780_20170113235941423540143795.aud'
removed `./opum_ora_7448_20160602072824080487143795.aud'
removed `./opum_ora_25740_20160704060001516869143795.aud'
removed `./opum_ora_18222_20170211181055180098143795.aud'
removed `./opum_ora_14988_20160619075753542821143795.aud'
removed `./opum_ora_18060_20170510231755910407143795.aud'
removed `./opum_ora_4974_20160904032946872225143795.aud'
removed `./opum_ora_22492_20160810164246080476143795.aud'
removed `./opum_ora_30220_20160730184335973711143795.aud'
removed `./opum_ora_9281_20160601050646550905143795.aud'
removed `./opum_ora_23802_20161007002846100802143795.aud'
removed `./opum_ora_31124_20170722151749240758143795.aud'
removed `./opum_ora_19994_20160603044311483365143795.aud'
removed `./opum_ora_12052_20160228214028001728143795.aud'
removed `./opum_ora_15291_20170914184724665451143795.aud'
removed `./opum_ora_22103_20160603225229269785143795.aud'
removed `./opum_ora_16853_20170731031019341399143795.aud'
removed `./opum_ora_17237_20170418113002372693143795.aud'
removed `./opum_ora_6563_20161224000002747653143795.aud'
removed `./opum_ora_25523_20170623172237509923143795.aud'
removed `./opum_ora_31895_20160806180001664608143795.aud'
Virt-manager will exit with Error polling connection ‘qemu:///system’: internal error Cannot find suitable emulator for x86_64
Solution:Enter the BIOS settings Check the CPU features to ensure that virtualization is enabled for KVM.
Permissions on the password database may be too restrictive. su: incorrect password Problem
Environment
- SLES for SAP Applications 11.4 (x86_64)
- SUSE Linux Enterprise Server 11 (x86_64)
Issue
- Permissions on the password database may be too restrictive.
su: incorrect password
Resolution
- Re-create the oragrid user.
agrcpgd1:oraegp 54> su – oragrid
Password:
Permissions on the password database may be too restrictive.
su: incorrect password
- check user id and group id
agrcpgd1:~ # cat /etc/passwd| grep oragrid
oragrid:x:507:503:Grid Admin:/home/oragrid:/bin/bash
agrcpgd1:~ # id oragrid
uid=507(oragrid) gid=503(dba) groups=503(dba)
- Remove oragrid user without -r option.(-r option:To remove the user’s home directory and mail spool )
agrcpgd1:~ # userdel oragrid
no crontab for oragrid
- Add user with userid and groupid.
agrcpgd1:~ # useradd -u 507 -g 503 -c “Grid Admin” -d /home/oragrid oragrid
agrcpgd1:~ # passwd oragrid
Changing password for oragrid.
New Password:
Reenter New Password:
Password changed.
agrcpgd1:oraegp 51> su – oragrid
Password:
oragrid@agrcpgd1:~>
Oracle Enterprise Manager Cloud Control 12c Release on EXADATA
Please execute the below steps to restart the agent on Exadata;
Commands to be executed with “orarom” user;
/opt/OracleHomes/agent_home/agent_inst/bin/emctl status agent
/opt/OracleHomes/agent_home/agent_inst/bin/emctl stop agent
/opt/OracleHomes/agent_home/agent_inst/bin/emctl start agent
Example;
[root@exa01dbadm02 ~]# su – orarom
[orarom@exa01dbadm02 ~]$ /opt/OracleHomes/agent_home/agent_inst/bin/emctl status agent
Oracle Enterprise Manager Cloud Control 12c Release 4
Copyright (c) 1996, 2014 Oracle Corporation. All rights reserved.
—————————————————————
Agent is Not Running
[orarom@exa01dbadm02 ~]$ /opt/OracleHomes/agent_home/agent_inst/bin/emctl stop agent
Oracle Enterprise Manager Cloud Control 12c Release 4
Copyright (c) 1996, 2014 Oracle Corporation. All rights reserved.
Agent is Not Running
[orarom@exa01dbadm02 ~]$ /opt/OracleHomes/agent_home/agent_inst/bin/emctl start agent
Oracle Enterprise Manager Cloud Control 12c Release 4
Copyright (c) 1996, 2014 Oracle Corporation. All rights reserved.
Starting agent ……………………………………………………. ……………………… started.
[orarom@exa01dbadm02 ~]$
EXADATA: How to configure ssh for current user on a list of nodes?
APPLIES TO:
Oracle Exadata Storage Server Software – Version 11.2.1.2.0 and later.
GOAL
Customer needs steps to configure ssh on exadata.
SOLUTION
Run the following on a db node, and follow the prompts.
/opt/oracle.SupportTools/onecommand/setssh-Linux.sh -h /opt.oracle.SupportTools/onecommand/all_nodelist_group
This will configure passwordless ssh for current user for the list of nodes specified in all_nodelist_group.
If the utility is missing, it can be extracted from a current download of the onecommand utility
see Document : 888828.1 – Exadata Database Machine and Exadata Storage Server Supported Versions
/opt.oracle.SupportTools/onecommand/all_nodelist_group —you may need to create a file with the host entries for which you need SSH.
Example;
IBSWITCH_GROUP –Keep the ibswitches in that file and pass in that command.
[root@exa01dbadm01 ~]# cd /opt/oracle.SupportTools/onecommand/
[root@exa01dbadm01 onecommand]# vi IBSWITCH_GROUP
exa01sw-iba01
exa01sw-ibb01
[root@exa01dbadm01 onecommand]#chmod 775 IBSWITCH_GROUP
[root@exa01dbadm01 onecommand]# ./setssh-Linux.sh -s -p PassWord -n N -h IBSWITCH_GROUP
[root@exa01dbadm01 onecommand]# cat IBSWITCH_GROUP
exa01sw-iba01
exa01sw-ibb01
[root@exa01dbadm01 onecommand]# ssh exa01sw-iba01
Last login: Sat Oct 14 15:39:56 2017 from exa01dbadm01.omsan.com.tr
You are now logged in to the root shell.
It is recommended to use ILOM shell instead of root shell.
All usage should be restricted to documented commands and documented
config files.
To view the list of documented commands, use “help” at linux prompt.
[root@exa01sw-iba01 ~]#
For different user from root (for example oracle user)
EXADATA passwordless SSH login not working for oracle user
i. Login to the oracle account:
# su – oracle
ii. Create a dcli group file listing the nodes in the Oracle Cluster.
iii. Run the setup ssh script (this assumes the oracle password on all servers in the dbs_group list is set to “welcome””
$./setssh-Linux.sh -s -p welcome1 -n N -h dbs_group
Source:Oracle support note(Doc ID 1923785.1)
How can I check the port status of my fibre channel HBA?
Environment
- Red Hat Enterprise Linux 5
- Red Hat Enterprise Linux 6
Issue
- Need to check the port status of my fibre channel HBA
Resolution
- The state of the port can be checked within the /sys/class directory either via
$ systool -c fc_host -v    from sysfsutils package
Class = "fc_host"

  Class Device = "host10"
  Class Device path = "/sys/class/fc_host/host10"
    fabric_name         = "0x200000e08b8068ae"
    issue_lip           =
    node_name           = "0x200000e08b8068ae"
    port_id             = "0x000000"
    port_name           = "0x210000e08b8068ae"
    port_state          = "Linkdown"
    port_type           = "Unknown"
    speed               = "unknown"
    supported_classes   = "Class 3"
    supported_speeds    = "1 Gbit, 2 Gbit, 4 Gbit"
    symbolic_name       = "QLE2460 FW:v5.06.03 DVR:v8.03.07.15.05.09-k"
    system_hostname     = ""
    tgtid_bind_type     = "wwpn (World Wide Port Name)"
    uevent              =

    Device = "host10"
    Device path = "/sys/devices/pci0000:00/0000:00:04.0/0000:08:00.0/host10"
      optrom_ctl          =
      reset               =
      uevent              =
:
or if sysfsutils package is not installed
[root@axx /]# grep -v "zZzZ" -H /sys/class/fc_host/host*/port_state
/sys/class/fc_host/host0/port_state:Linkdown
/sys/class/fc_host/host1/port_state:Linkdown
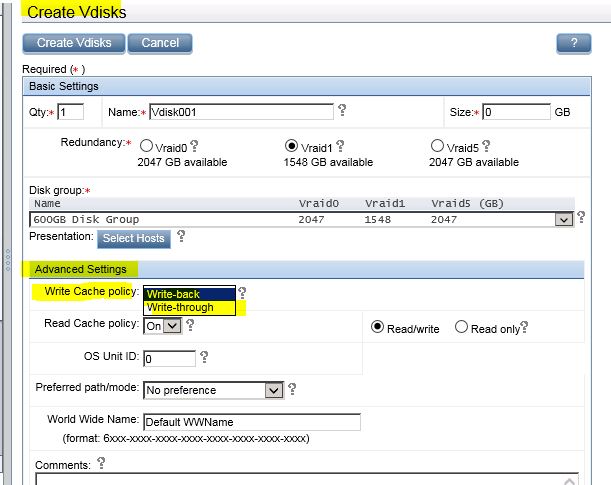
Raid Card options: Write-through,write-back, write-around
Aim:Reducing latency in accessing data.
What is the difference between write-through, write-around, write-back?
Cache:Storing copy of data temporarily and local to CPU.
Write-through: is a storage method in which data is written in to the cache (RAM-Memory) and corrosponding main memory (disk-SAS/SATA etc.) location at same time. Select this option where data loss cannot be tolerated.
Advantages;
- Minimize the risk of data loss.
- safely.
- Ensures that nothing will get lost if crash, power failure etc. low read latency.
Disadvantages;
- Every write operation must be done twice and this redundancy takes a time.high write latency.
Write-back: is a storage method in which data is written in to the cache every time a change occurs but is written in to the disk(SAS/SATA etc.) only at specified intervals or under certain conditions.Select this option where data loss can be tolerated
Advantages:
- Optimize system speed because it takes less time to write data into cache.
Disadvantages:
- The risk of data loss in case of a crash or other adverse event.
Write-around: is a similar to write-through cache but write I/O is written directly to permanent storage (disks-SAS/SATA etc.) bypassing the cache.
How to setting cache setting on HP EVA storage?
From create virtual disk->Advance settings->Write cache policy:
Linux (CUPS) Spooler Troubleshooting
Step 1:Check Error logs
Command: tail -f /var/log/cups/error_log
I [08/Mar/2017:16:58:03 +0300] [Job ???] Request file type is text/plain.
 I [08/Mar/2017:16:58:03 +0300] [Job 7] Adding start banner page "none".
 I [08/Mar/2017:16:58:03 +0300] [Job 7] Adding end banner page "none".
 I [08/Mar/2017:16:58:03 +0300] [Job 7] File of type text/plain queued by "emdadm".
 I [08/Mar/2017:16:58:03 +0300] [Job 7] Queued on
 "TEST_LABEL_PRINTER" by "emdadm".
Linux (CUPS) Spooler Commands
Step 2:To view the status of all print queues:
Command: lpc status
Example:
serddad1:~ # lpc status
 TEST_LABEL_PRINTER:
 printer is on device 'socket' speed -1
 queuing is enabled
 printing is enabled
 1 entries
 daemon present

PROD_LABEL_PRINTER:
 printer is on device 'socket' speed -1
 queuing is enabled
 printing is enabled
 1 entries
 daemon present
Step 3:To check the status of a single print queue and view a list of pending jobs:
Command: lpc status printer_name, lpstat -P printer_Name,
lpstat -pprinter_name
Example:
serddad1:~ # lpc status TEST_LABEL_PRINTER
 TEST_LABEL_PRINTER:
 printer is on device 'socket' speed -1
 queuing is enabled
 printing is enabled
 1 entries
 daemon present
 serddad1:~ # lpstat -P TEST_LABEL_PRINTER
 TEST_LABEL_PRINTER-1 root 17408 Tue Feb 28 14:38:09 2017
 serddad1:~ # lpstat -pTEST_LABEL_PRINTER
 printer TEST_LABEL_PRINTER is idle. enabled since Thu Mar 9 14:30:20 2017
Step 4:To remove a single print job:
Command: cancel printer_name-id(check output of lpstat -P TEST_LABEL_PRINTER) ,
Example:
serddad1:~ # cancel TEST_LABEL_PRINTER-1
Step 5:To remove all print jobs in a queue:
Command: cancel -a printer_name
Example:
serddad1:~ # cancel -a TEST_LABEL_PRINTER
Step 6:To enable a queue:
Command:cupsenable printer_name
Example:
serddad1:~ # cupsenable TEST_LABEL_PRINTER
Step 7:To disable a queue:
Command:cupsdisable printer_name
Example:
serddad1:~ # cupsdisable TEST_LABEL_PRINTER
Step 8:To enable all queues:
Command:
lpstat -p | grep disabled | awk '{print $2}' | xargs cupsenable
Example:
serddad1:~ #lpstat -p | grep disabled | awk '{print $2}' | xargs cupsenable
Step 9:To print a test job:
Command:
echo test_page | lpr -P printer_name
Example:
serddad1:~ #echo test_page | lpr -P TEST_LABEL_PRINTER
Step 10:To restart/refresh the cups service:
Command:
service cups restart
ORA-15032, ORA-15040, ORA-15042 Error on Oracle ASM
ERROR:Try to mount the disk group on ASM
SQL> alter diskgroup RECOc1 mount;
alter diskgroup RECOc1 mount
*
ERROR at line 1:
ORA-15032: not all alterations performed
ORA-15040: diskgroup is incomplete
ORA-15042: ASM disk “2” is missing from group number “2”
Check Alert Log:
Wed Feb 15 15:32:15 2017
NOTE: Disk RECOC1_0000 in mode 0x7f marked for de-assignment
NOTE: Disk RECOC1_0001 in mode 0x7f marked for de-assignment
ERROR: diskgroup RECOC1 was not mounted
ORA-15032: not all alterations performed
ORA-15040: diskgroup is incomplete
ORA-15042: ASM disk “2” is missing from group number “2”
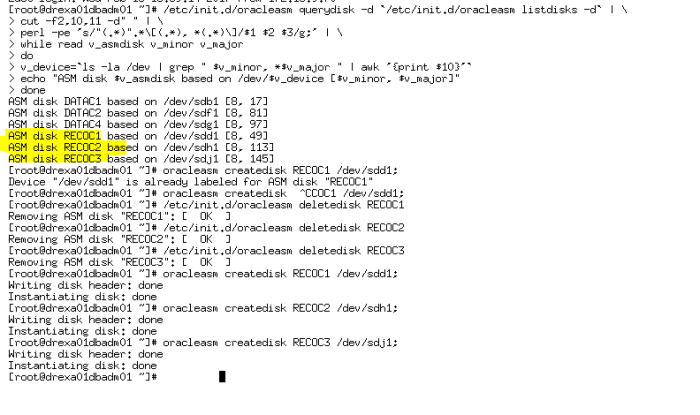
SOLUTION:
All transactions must be done by root user.
1-Scan and find RECOC1 disks with scripts;
/etc/init.d/oracleasm querydisk -d `/etc/init.d/oracleasm listdisks -d` | \
cut -f2,10,11 -d” ” | \
perl -pe ‘s/”(.*)”.*\[(.*), *(.*)\]/$1 $2 $3/g;’ | \
while read v_asmdisk v_minor v_major
do
v_device=`ls -la /dev | grep ” $v_minor, *$v_major ” | awk ‘{print $10}’`
echo “ASM disk $v_asmdisk based on /dev/$v_device [$v_minor, $v_major]”
done
2-Remove RECOC* found disks
/etc/init.d/oracleasm deletedisk RECOC1
/etc/init.d/oracleasm deletedisk RECOC2
/etc/init.d/oracleasm deletedisk RECOC3
3-Add re-create RECOC* disks
oracleasm createdisk RECOC1 /dev/sdd1;
oracleasm createdisk RECOC2 /dev/sdh1;
oracleasm createdisk RECOC3 /dev/sdj1;
if flashback on, you have to off it on your oracle database and use the grid user for below processes.
- On GUI–>open asmca—>Disk Group Name:RECOC1 select 3 disks to add diskgroup
- check your alert log again.
SUCCESS: diskgroup RECOC1 was mounted
Wed Feb 15 15:46:30 2017
SUCCESS: CREATE DISKGROUP RECOC1 EXTERNAL REDUNDANCY DISK ‘/dev/oracleasm/disks/RECOC1’ SIZE 102398M ,
‘/dev/oracleasm/disks/RECOC2’ SIZE 1048570M ,
‘/dev/oracleasm/disks/RECOC3’ SIZE 511993M ATTRIBUTE ‘compatible.asm’=’12.1.0.0.0′,’au_size’=’1M’ /* ASMCA */
Wed Feb 15 15:46:30 2017
